Configuration for Loxone
You can integrate the Gateway into your own Loxone system. There are now three methods to do this. The most simple method is to use the Restful API of the Gateway to send and retrieve data via simple HTTP. Alternatively you can use MQTT and Loxberry. And as the latest option you can use Modbus TCP.
For Loxone it is possible to use all the advanced climate control features of Loxone. See this PDF document for a example installation with a Buderus Buderus Logamax Plus GB192 and Loxone.
Note
With the new API V3 some actions need a HTTP POST/PUT instead of HTTP GET. See below on how to use a HTTP POST in Loxone to control boiler parameters. Some images below use the syntax from the old API. This does not work anymore. See the description for the proper syntax.
Both methods are described below.
Many thanks to Martin for writing up the guide.
Using the Restful API for HTTP
As of firmware version 2.1 the Gateway supports a HTTP Restful API that Loxone can directly communicate with. See the EMS-ESP HTTP API [1] page.
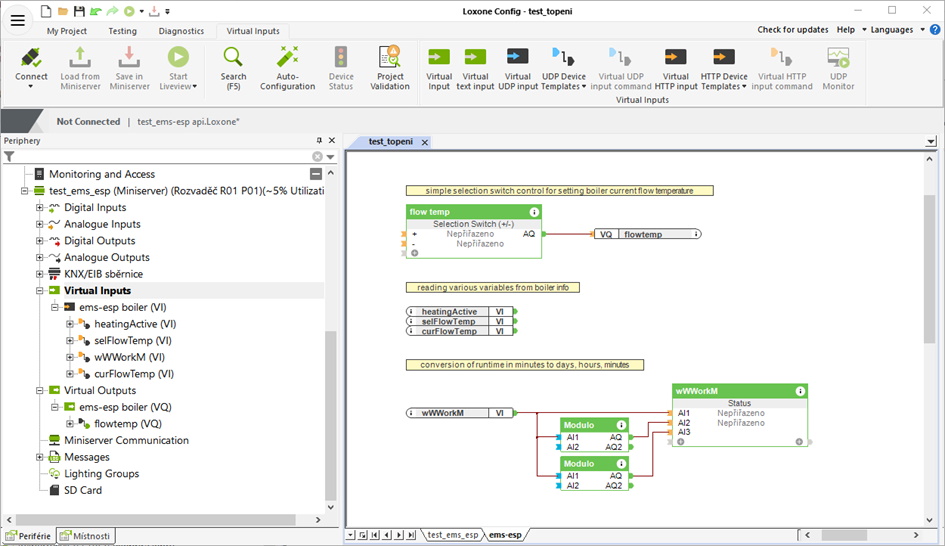
virtual inputs
First, create virtual HTTP input and then virtual HTTP input commands.
You can check all available parameters with the command:
http://[ems-esp-ip]/api/boiler/commands
You can replace ‘boiler’ with any device you have and EMS-ESP supports (thermostat, mixer etc). ‘[ems-esp-ip]’ is the IP address of the Gateway.
For instance to see the JSON output of the values of your system:
http://[ems-esp-ip]/api/boiler/info
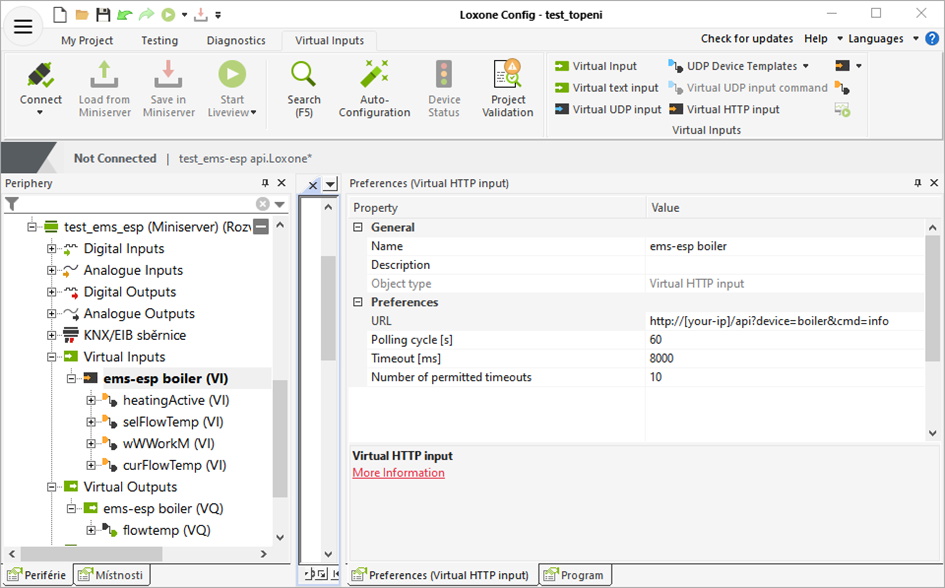
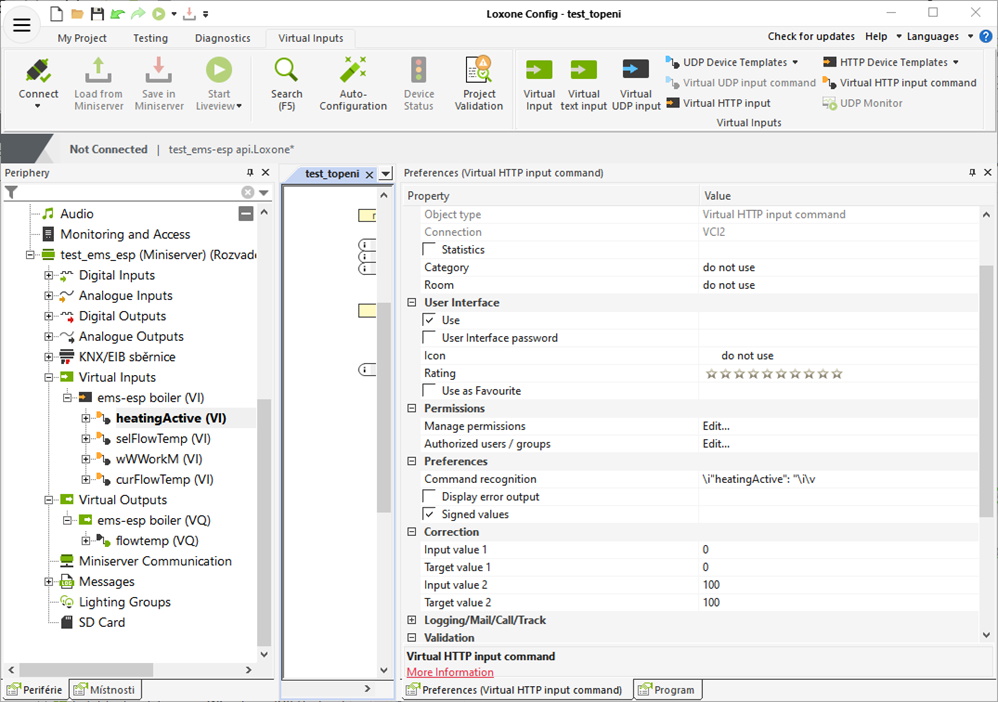
Fill the configuration of virtual input we just added. Replace [your-ip] with your actual Gateway IP address and set the polling cycle and other params as you wish. Now, add virtual inputs (with ‘virtual HTTP input command’, while the virtual input is selected). Add a separate input for each information you want to have in Loxone.
Parsing individual information from the API (/api/boiler/info) is a little tricky. The structure should be something like this:
{
  "heatingActive": "0",
  "tapwaterActive": "1",
  "selFlowTemp": 85,
  "selBurnPow": 100,
  "curBurnPow": 55,
  "pumpMod": 89,
  …
To read “heatingActive” your Command recognition should be
\i"heatingActive": "\i\v
See the documentation. For example
\iSomeText\i\v
means skip SomeText and read value that follows. Notice that binary parameters (heatingActive, tapwaterActive) have quoted values, while analog (selFlowTemp…) do not. This has to be taken into account in the command recognition.
To convert work time from minutes to days, hours and minutes, you can use combination of modulo and status. Upper modulo AI2 param is 1440, lower modulo AI2 param is 60 and the status text formula is
<v1/1440>d <v2/60>h <v3>m
Virtual outputs
Create virtual output, and fill in your EMS-ESP IP address.
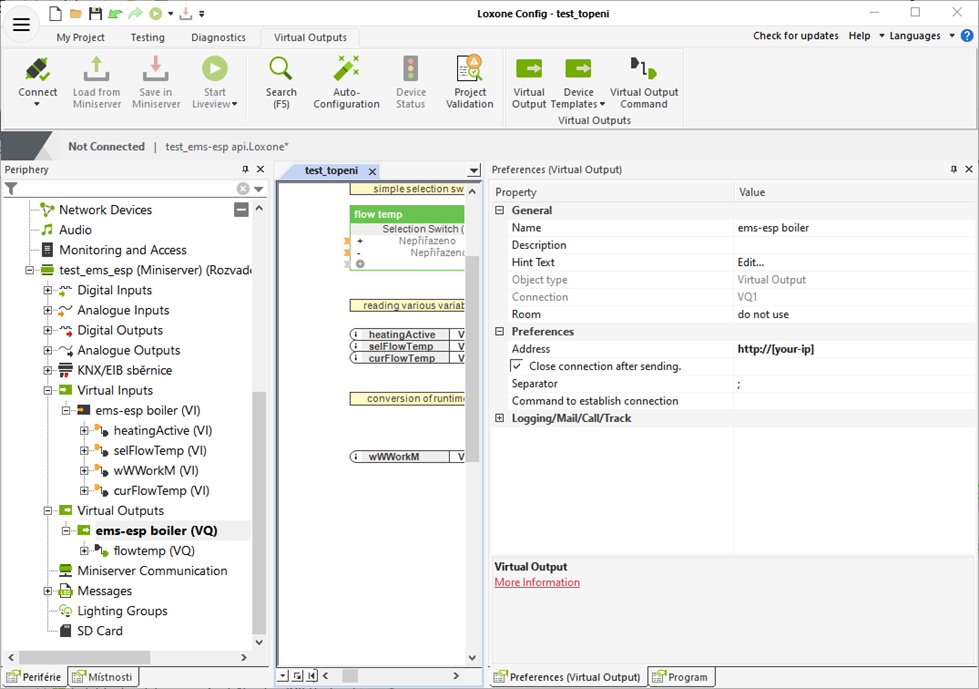
Create ‘Virtual Output Command’ for each variable you want to send from Loxone to EMS-ESP. Flowtemp is for setting requested Heating temperature. Make sure your VOC is not set as digital. Optionally set a Repetition Interval. Some boilers (such as Junkers) will revert back to default settings after certain period of time, so the command has to be send repeatedly.

To control flowtemp from Loxone, you can create a Selection switch and connect it to flowtemp VOC as on first image, or integrate it in your automation however you desire.
Results
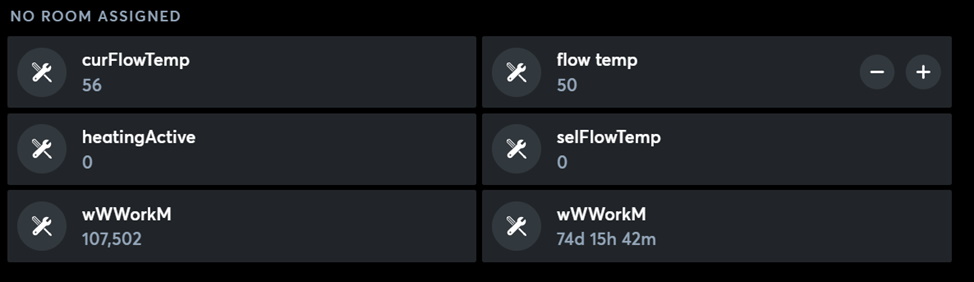
If you have comnfigured it correctly, you should now see something like this in your Loxone:
Using HTTP POST for controlling parameters
As a security measure, to control parameters of your system you cannot use HTTP GET. Instead you have to use HTTP POST together with an access token to control the parameters. See the EMS-ESP HTTP API [1].
You can get the access token in the EMS-ESP settings in the Security panel. Click on the key icon on the user row. Then you will get a pop up where you can copy the token.
In the body fill in the actual command.
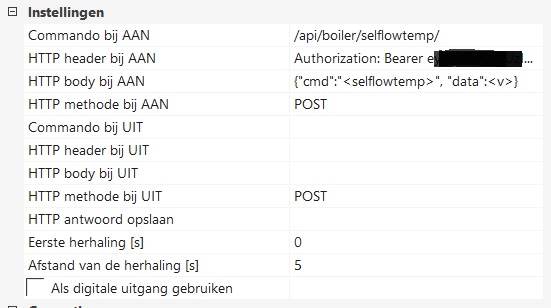
HTTP header for this action:
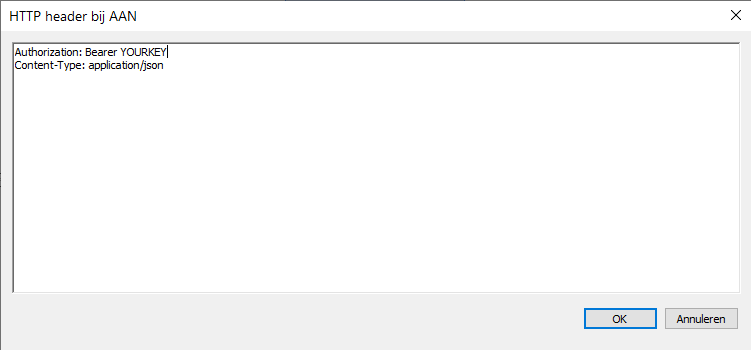
Replace YOURKEY with the access key from EMS-ESP.
Additional Pi with Loxberry
Alternatively Loxberry with the MQTT plugin can be used instead of the Restful API.
First setup a Raspberry Pi with Loxberry OS. This can be downloaded from the Lox Wiki [2].
It has a fairly straightforward configuration, well described in their wiki.
Then you’ll need to add the Loxberry MQTT Gateway plugin [3].
In the settings, just make sure to tick ‘expand JSON data’ and ‘convert booleans’. No need to change anything else.
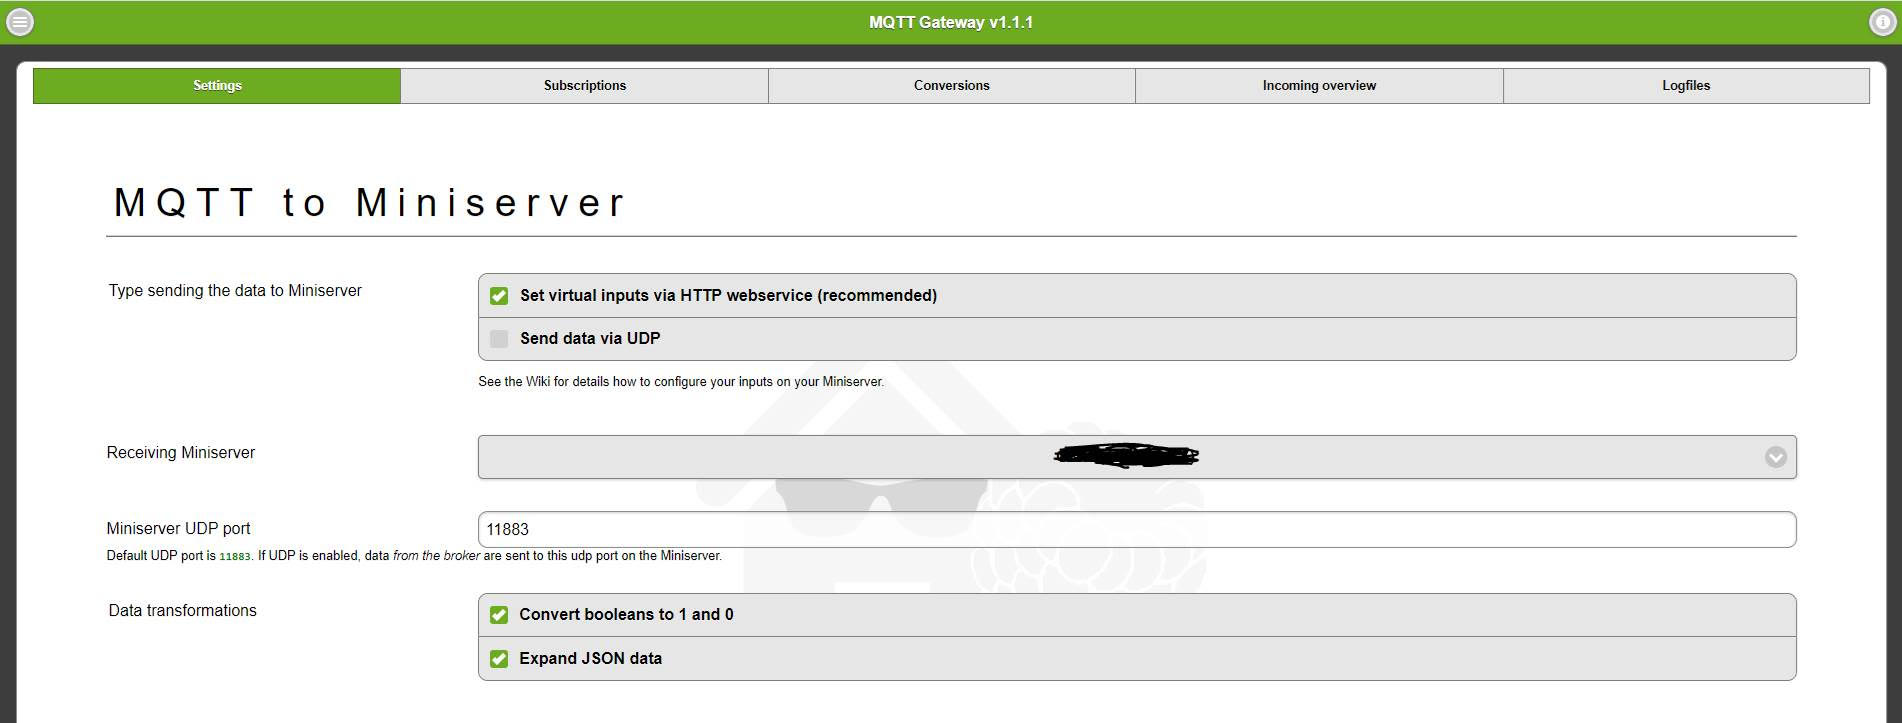
Further plugin settings
On the subscriptions page you want to subscribe to topic ‘ems-esp/#’.
On the EMS-ESP update MQTT settings fill in your Loxberry IP; Port will be the default one 1883 (the other ports mentioned in Loxberry MQTT settings are used for communication with Loxone); And finally the username and password (these can be found on the Loxberry MQTT settings page).
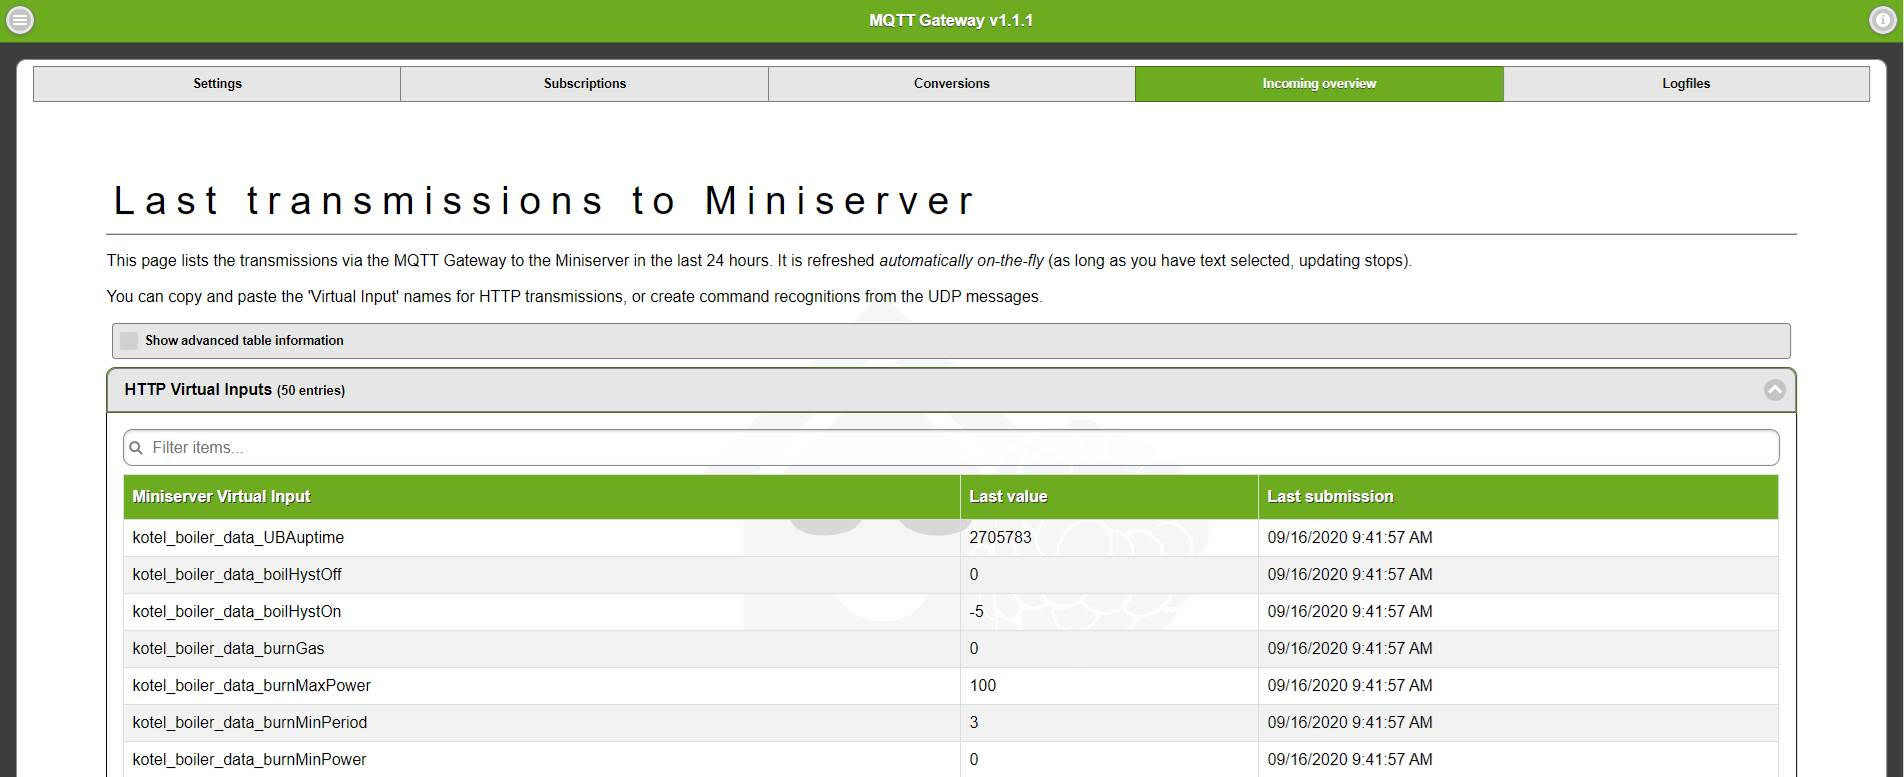
Now you should see the messages from ems-esp on loxberry MQTT ‘Incoming Overview’ page.
Getting data into Loxone
To get the data to Loxone, there is a good video tutorial on the Loxberry MQTT Gateway plugin [3] page.
In Loxone, you’ll have to create virtual inputs, name them exactly the same as the Loxberry ‘Miniserver Virtual Input’ name in the messages overview (e.g. ‘kotel_boiler_data_UBAuptime’) and Loxberry will take care of updating the values in miniserver.
MQTT structure
See EMS-ESP Wiki [4] for all the details on MQTT.