Updating or downgrading the Gateway firmware
Warning
If you load the incorrect firmware you will brick your Gateway and you cannot access it anymore via the web interface. You have to use one of the other methods below to bring it back to life.
Do not perform a software update when you do not have physical access to the device. In case the update goes wrong, you need to use the USB connection on the Gateway. So if the Gateway is in a remote location, postpone the update until you are near the device.
Note
EMS-ESP is under continuous development. There are often breaking changes in the code. This means that after an update some things work differently, or it does not behave in the way you expected anymore or some functions are deprecated. Please carefully read the changes on the repository before applying an update.
The Gateway as delivered to you is loaded with a recent version of the open-source EMS-ESP32 firmware from Proddy’s Github repository.
It is very easy to do firmware updates yourself via the web interface. Aside from stable releases you can also load beta versions (pre-releases) and you can also downgrade the firmware if needed.
Updating firmware via the web interface
The firmware, which is basically the software for the microprocessor on the Gateway, is packed a binary file. These files have the .bin file extension.
You can either download the bin file from the firmware repository or go to the web interface of the Gateway and and visit Settings->Upload/Download.
There you will see a link to download either the latest stable release or the newest development release.

If you click on download, it will download the bin file to your computer (not to the Gateway).
Alternatively you can download the correct bin file from the firmware releases page of the correct software repository.
For the Gateway E32 V2, S3 and older products like the E32 V1.5 and S32 download the bin file from the EMS-ESP32 repository. See the firmware releases EMS-ESP32 [2] page. Depending on the firmware there may be more different bin files available.
Now click on the ‘assets’ button. A number of files will appear. Select the correct bin file.
For the E32 V2 use the -ESP32-16MB+.bin file. For S3 and S3-LR use the -ESP32S3-16MB+.bin bin file.
For the S32 V2 use the -ESP32-16MB.bin file. For the S32 V1 and the older E32 V1-V1.5 use the -ESP32-4MB.bin file.

If you click on the (correct!) bin file, it will be downloaded to your pc. Now take note where this file is stored.
Next go to the Gateway web interface (via the same computer) and select the firmware update page.
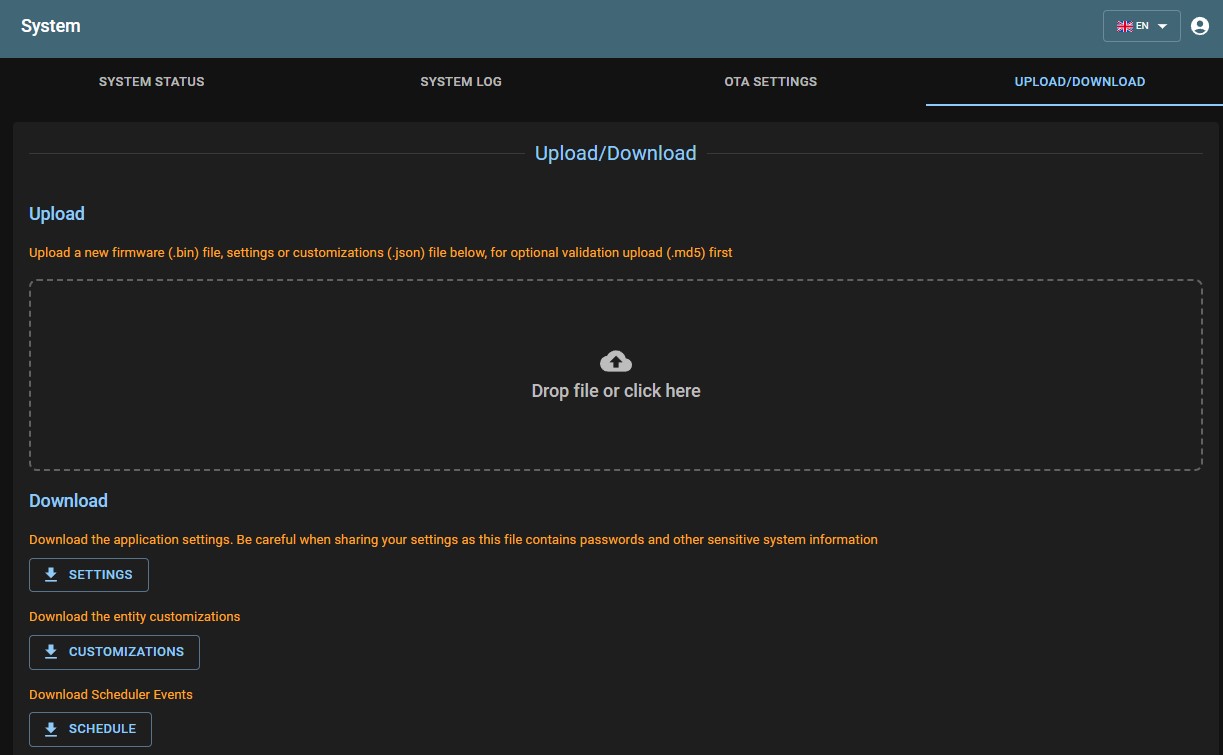
Click in the upload window and select the bin file you just downloaded and wait until the update is completed. Do NOT close the web page. After a minute or two refresh the page and now the new version should be active. You can check the version via Settings.
If you perform an update via the web interface, all settings are stored. However, sometimes settings may go corrupt and you have to configure EMS-ESP like new.
If your Gateway works fine and there are no significant new features, its not recommended to update the firmware just for the sake of updating. Some firmware versions are not stable, features might be missing, and it can give stability or other issues.
Using beta firmware
Its also possible to install beta versions via the web interface. However, in rare cases a wrong beta version may brick the Gateway and thus you cannot reach the web interface anymore. In that case you have to use Platform IO, NodeMCU/ESPFlasher flash tool or the Espressif ESPtool to write a stable firmware version to the Gateway. If you don’t know how to do this, its better to not install beta versions.
Downgrading firmware
If for some reason you want to go back to a previous firmware version, use the method as described above to select a stable version on the firmware releases page and to upload it to the Gateway.
Uploading the firmware via EMS-ESP Flasher flashtool
For loading the firmware onto the Gateway you need to use the EMS-ESP Flasher tool [5]. See the image above. Do not use another tool as this version creates the correct partition sizes for EMS-ESP.
The tool is available for Windows, MacOS and some Linux versions. For Windows, download EMS-ESP-Flasher.exe. For MacOS, download the macOS.tar file and unzip it.

Attention
Pay attention to the ‘Keep Settings’ checkmark. If it is off, you will erase all flash memory and all settings you have made. With this method you are putting the Gateway into a factory new state. You can download the config from the web interface before the update, and upload it after the update. If you are updating when you had no issues, leave the checkmark checked to retain your settings.
Gateway S3, S3-LR and E32 V2
First remove the Gateway from the bus and connect a USB-C cable to the PC and the Gateways’ external USB connector. No external power supply is needed. Open the EMS-ESP-Flasher.exe tool. Set the correct COM port for the Gateway. If it is not auto-selected, or you do not know it find it with Device Manager. The driver should be automatically installed (Espressif USB driver). The device will likely be recognized directly if you hear the Windows ‘USB connected jingle’ sound. If you opened the EMS-ESP flash tool before you connected the Gateway, you need to click on the ‘Refresh’ button to load the COM port.
The image below is for the S3 and S3-LR.
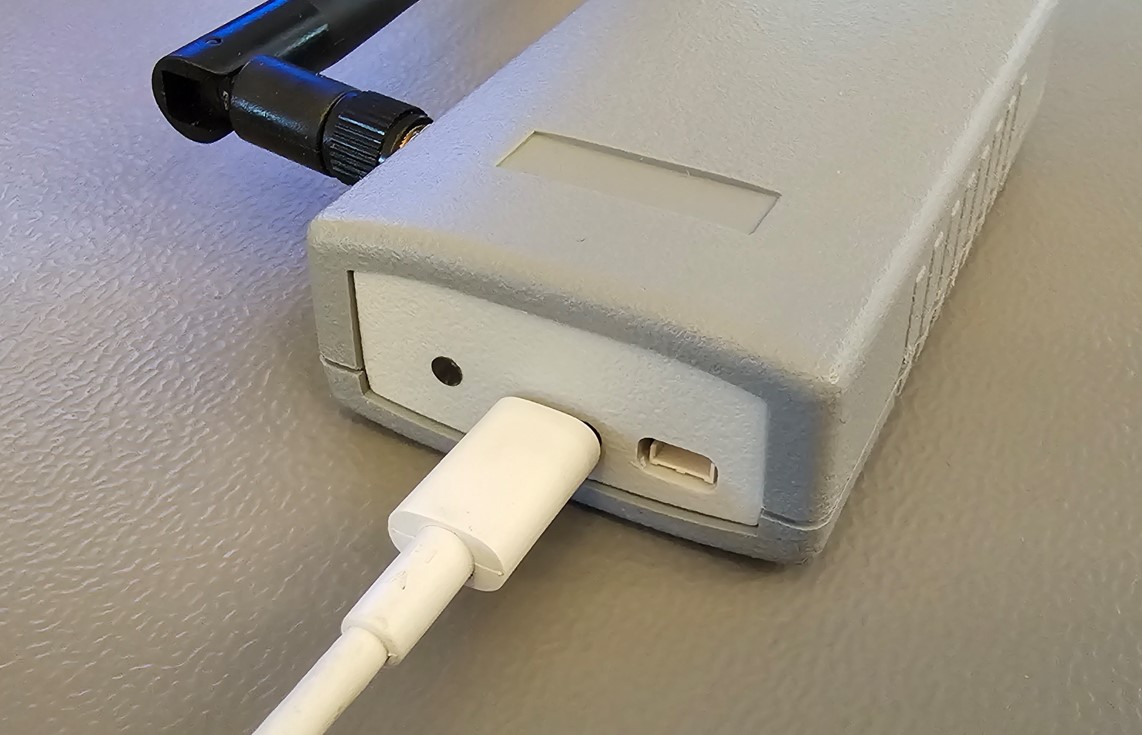
And for the E32 V2:

For the E32 V2 make sure you firmly press the cable into the slot because the USB connector is slightly recessed.
Uploading
After you selected the correct bin file and the COM port, you can press Start. Now first the chip is identified. Then it is erased. For some Gateway models the erasing make take quite long. Next the firmware is flashed.
If its ready, you’ll see something like below. You will perhaps get some errors at the bottom. You can ignore the LittleFS error and most other errors. This does not hurt operation of the Gateway.

If the upload was succesful, after about 20 seconds the LED will start blinking. If not, press the RST or boot button on the Gateway or unplug and reconnect the USB cable again. It should start blinking after some seconds.
After flashing
If the flashing was succesful, the LED will blink three times intermittently.
If the LED stays off, either the firmware flashing was not succesful, or the board profile is incorrect. You can change the board profile in the EMS-ESP setting menu.
Gateway S32
First remove the Gateway from the bus and connect a USB cable to the PC and the Gateways’ internal USB connector. No external power supply is needed. Open the EMS-ESP-Flasher.exe tool. Set the correct COM port for the Gateway. If you do not know it find it with Device Manager. Sometimes there is no driver installed, or it is behaving incorrectly (Win10).
Gateway E32 V1 and V1.5 (gray enclosure)
The part below is only for the older E32 in the gray enclosure. The new E32 V2 in the white enclosure has an external USB-C port.
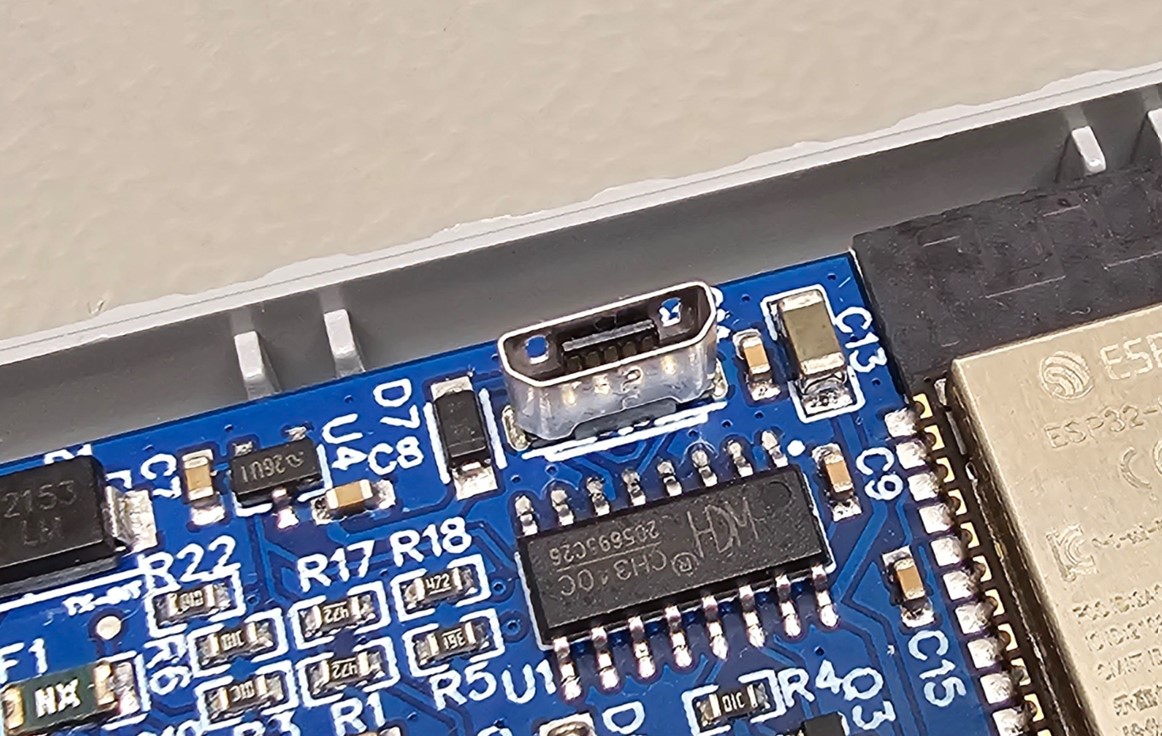
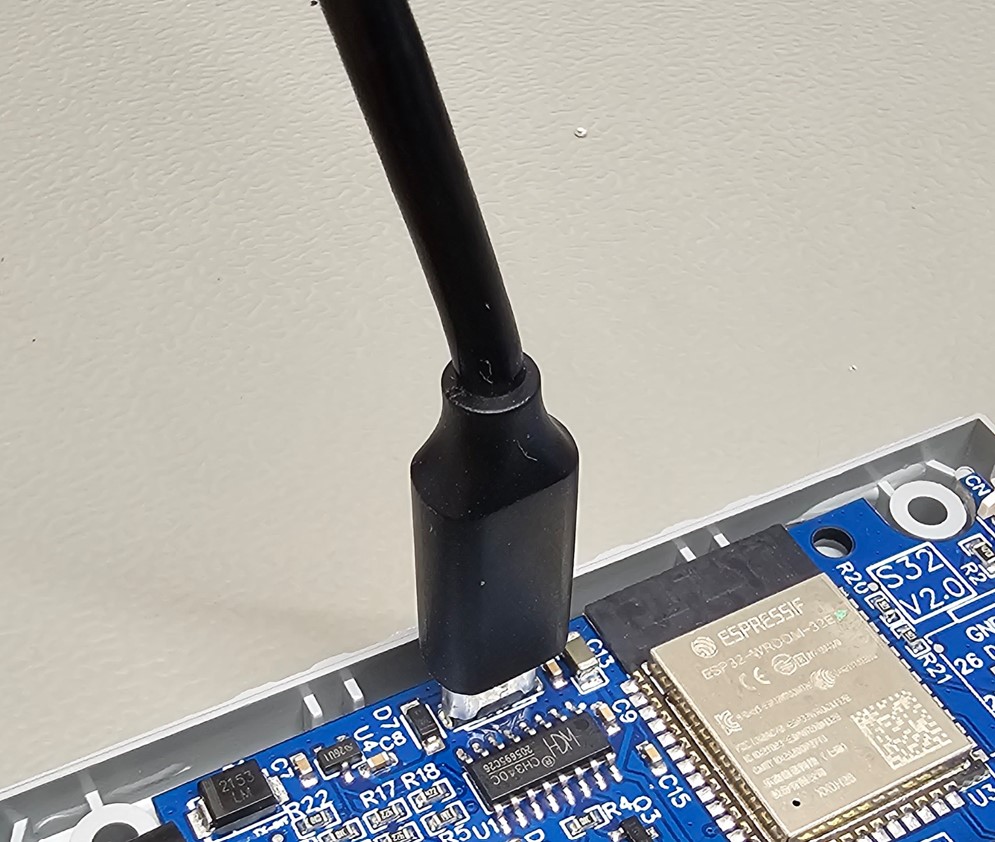
The 2022 model of the E32 has an internal micro USB port. Use this one to connect a cable to your pc. For the E32 it is recommended to connect the 12V DC power supply as the USB connection of the E32 can only supply very limited power.
Open the EMS-ESP-Flasher.exe tool and set the correct COM port for the Gateway.

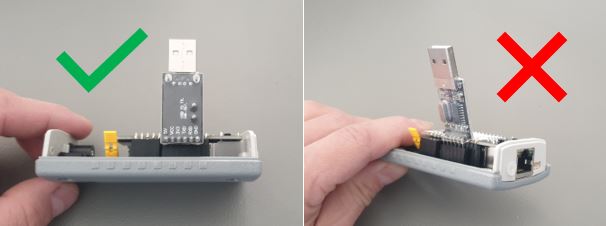
The 2021 E32 model without a screw connector have no USB port. To program these E32 models, you need to insert the CH340 USB stick into the header on the Gateway board. See below.
Make sure you insert the USB stick like below. There is only one way it will fit nicely.
Note
The CH340 driver is not always properly loaded in Windows 10. If no COM port shows up when you plugin the Gateway, the driver has failed to load. Reinstall the CH340 driver. Look at Sparkfun guide on installing the CH340 driver [4] for instruction on how to do so. Before installation remove the Gateway from the pc. After installation, reboot the pc.
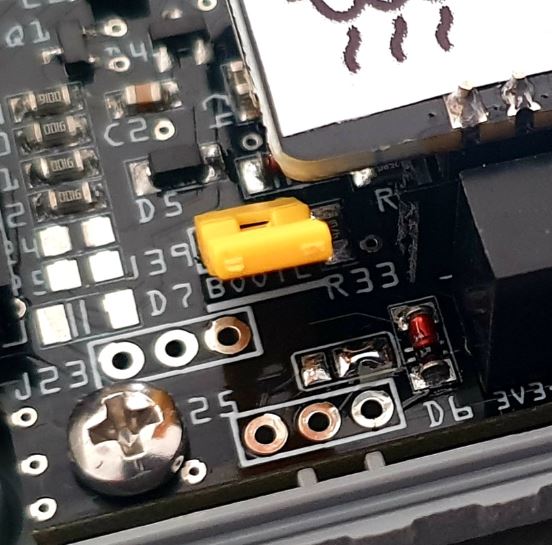
E32 model 2021 has a small yellow jumper on the board. Set it over the two header pins. This jumper sets the chip into bootloader mode so you can load the firmware. Open the EMS-ESP-Flasher.exe tool and set the correct COM port for the Gateway. After you have finished uploading the firmware, remove the jumper otherwise the Gateway will not reboot.
E32 Gateways with the internal USB port have an additional circuit to automatically set the E32 into bootloader mode. They do not have this jumper on board.
Note
This CH340 stick or internal USB port of the E32 can only be used for programming. After the firmware has been flashed, the Gateway will not start properly. Remove the CH340 stick or USB cable and connect it again to the service jack or the 12V power supply. Also do not forget to remove the yellow jumper otherwise the Gateway can’t boot.
Uploading
After you selected the correct bin file and the COM port, you can press Start. Now first the chip is identified. Then it is erased. For some Gateway models the erasing make take quite long. Next the firmware is flashed.
If its ready, you’ll see something like below. You will perhaps get some errors at the bottom. You can ignore the LittleFS error and most other errors. This does not hurt operation of the Gateway.
If the upload was succesful, after about 20 seconds the LED will start blinking. If not, press the RST or boot button on the Gateway or unplug and reconnect the USB cable again. It should start blinking after some seconds.
After flashing
If the flashing was succesful, the LED will blink three times intermittently.
If the LED stays off, either the firmware flashing was not succesful, or the board profile is incorrect. You can change the board profile in the EMS-ESP setting menu.
Building and loading firmware via Platform IO
See the instructions on the Proddy’s Github repository [1].
Loading firmware via the ESPtool
See the instructions on the Proddy’s EMS-ESP Wiki [3].
Loading firmware via OTA (Over The Air)
You can update the firmware via a feature called OTA. This means ‘Over The Air’. You need to use espota.py (just Google it).
The basic command is:
espota.py --debug --progress --port 8266 --auth ems-esp-neo -i <IP address> -f <firmware.bin>
Troubleshooting
If the LED does not blink at all, press the reset button on the Gateway. It should start blinking three times in a row. If it does not, the update failed.
If the update via the web interface has failed, try the EMS_ESP flash tool, ESPTool or Platform I/O method. If that did not work or it is too difficult, contact me via the contact form on the webshop.
If Ethernet does not work anymore, you have to set the board profile to E32 and reboot.