Posted on

28 October 2024: Firmware 3.7.0 release now available

After 6 months and 47 beta versions EMS-ESP32 firmware 3.7.0 has finally been released. It packs hundreds of improvements, new features and bug fixes.

Updating to 3.7.0 from 3.7.0dev

If you were already on a development version of 3.7.0, you can update the firmware via the update feature of the web interface.

Updating from 3.6.4 or 3.6.5 to 3.7.0

If you are currently on 3.6.4 or 3.6.5, you cannot update via the web interface directly.

Clicking on the bin file will result in an error. This is because after 3.6.5 the firmware bin file naming scheme has changed, so the 3.6.5 firmware is looking for a bin file on the Github repository that does not exist.

In this case go to the releases page of the firmware repository and download the correct bin file.

You can use the table here for getting the right file.

After you have downloaded this file to your computer, you can upload it via the EMS-ESP web interface.

After the reboot of the Gateway, press F5 to clear the browser cache otherwise there may still be some left overs of the old interface in the cache, causing strange UI combinations of both the old and the new user interface.

Possible issue with updating to 3.7.0 with the E32 V2

In some cases after the new firmware upload, the Ethernet interface of the E32 V2 may be disabled. Don’t worry, it’s not dead. In these cases the board profile of the firmware has accidentally defaulted to the S32 Gateway, which has no Ethernet.

To correct this, log in to the ems-esp WiFi network, go to settings and change the board profile to E32 V2. Then save and reboot and Ethernet will become alive again.

Posted on

Using the Smart Grid (SG) and Photovoltaic (PV) function of your heat pump with the EMS Gateways

Input 4 options

Almost every Bosch/Buderus/Nefit heat pump with an EMS bus has 4 external inputs. These can be used to block the operation of the pump etc, but also for Smart Grid (SG) and Photo Voltaic (PV) features. You can virtually switch these inputs with all EMS Gateways to have the heat pump operate in a specific way.

Currently it’s a bit of a read and some trial and error but once set it will work automatically.

https://emsesp.org/tips-and-tricks/#automating-the-onoff-of-the-heat-pump-in-home-assistant

Every Bosch heat pump has 4 of these inputs, it depends on the country and your specific system but usually input 3 and/or 4 can be used for SG and PV.

You need to check the system menu or the installation manual of the heat pump to check which features are supported on which input. In the installation manual you can see which action the heat pump can do when one of these inputs is enabled. If you cannot find the information in the installation manual, you need to look up the manual for the controller/display of your unit (Likely the UI800 or HPC410).

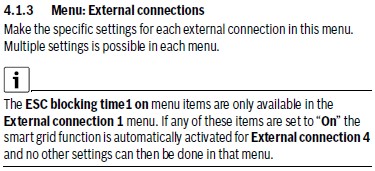
The section you need to look up is called “Menu: External connections” and will look something like below.

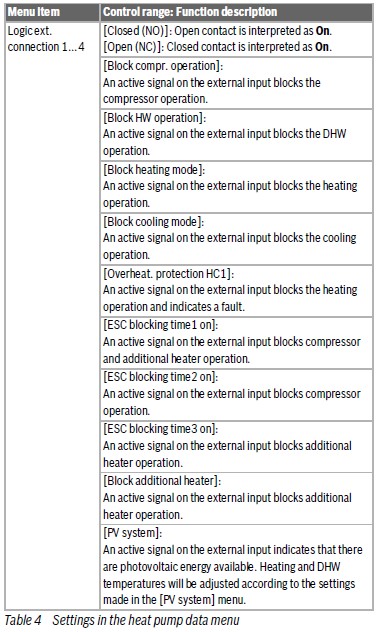
If you ook into the following example of the installation manual of the Compress 6800i, then PV and SG are both on the input 4.

Heat pump External connections menu settings
Heat pump external connection feature table

This menu will list all configurations that are possible to set for each input.
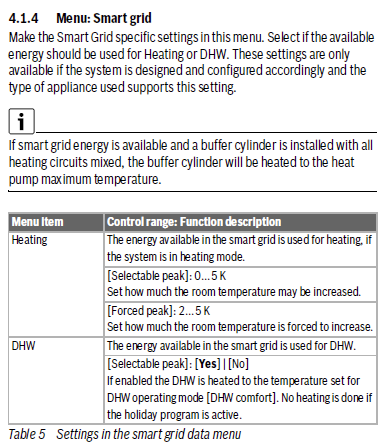
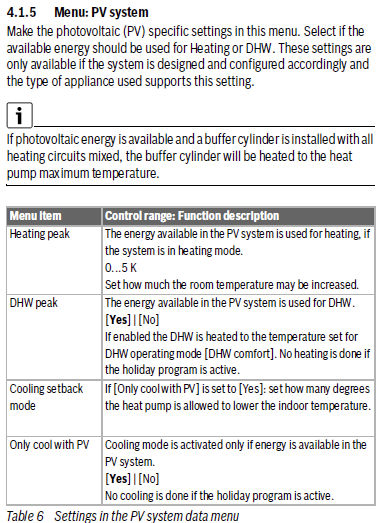
The Smart Grid and PV System menu are the most interesting.

Smart Grid settings Bosch heat pump
PV menu setting Bosch heat pump

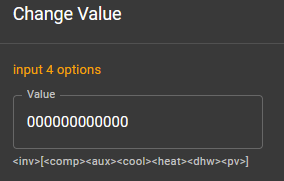
In the web interface of the Gateway you can see the input state of each input, and also the configuration of each input. In the example below the options for input 4.

Input 4 state
Input 4 options

If you change the configuration the the menu to the SG and/or PV feature you want to activate, you can see the corresponding input values.

You can send these same values from Home Assistant to the Gateway to enable these features.

However, the heat pump expects the actual input to be enabled. But there is nothing physically attached to the inputs. But there is a workaround. The first bit of the configuration will tell the heat pump if the signal is active high, or active low.
So it should enable the function if the physical state of the input is ‘Normally Open’ and thus enabled when closed, or ‘Normally Closed’, and thus enabled when open. What we need is the second one. As the manual describes: “Open contact is interpreted as ‘ON’“.

If we invert the logic here, and attach and detach the configuration to the input every time we need it, you can turn on or off the PV and SG feature of your heat pump with your EMS Gateway.

You can use the same logic to activate the ‘EVU Sperre’ feature etc.

Posted on

Massive firmware update now available: EMS-ESP 3.5.0

Firmware EMS-ESP 3.5.0 has been available as a beta for quite some time and it had already been loaded on new Gateways since October 2022, the release version of 3.5.0 (stable) is now available as well.
Thanks to a lot of work by Proddy and MichaelDvP and assisted by a number of other contributors, this is one of the most feature rich updates yet.

Remember the firmware is completely open source

The the most noticeable new feature is going to be the addition of localization. This means you can now change the language from English to other languages. The release of 3.5.0 will contain English, German, Dutch, Polish, French, Swedish and Norwegian language.

This localization is in all major parts of EMS-ESP: the web interface and MQTT.

There are however some breaking changes. The most important one is that there is now support for multiple Gateways on a single MQTT broker. When enabled, which is now the default, all MQTT Discovery Entity IDs will include the MQTT base name and the shortname of the EMS-ESP device entity. For example what was previously sensor.boiler_actual_boiler_temperature will now become sensor.ems_esp_boiler_boiltemp. This means these entities will have to be replaced inside HA. See below. If you still want to use the old format and retain the history and script compatibility in Home Assistant then set this back to the old format.

New features and updates

Summary of new stuff:

  • Localization: addition of German, Dutch, Polish, Swedish, French and Norwegian language options.
  • Support for multiple Gateways on the same broker (for hybrid systems and for multiple boilers/cascade)
  • 100+ bug fixes and new features
  • Added initial support for ESP32 C3 and S2 architectures
  • Several new board profiles
  • Improvements in HA Discovery and MQTT handling
  • Addition of new EMS boilers, thermostats and other devices (Greenstar 30, GBH192iT, FW500, BC30)
  • Addition of additional parameters of known EMS devices (f.i. RC30 internal temp, 20+ heat pump parameters)
  • Improved handling of logic/telegrams of some EMS devices
  • Setting the 4 multi-purpose relays/inputs of heatpumps (via API)

Full release notes see: https://emsesp.github.io/docs/#/Release-notes

How to update to 3.5.0

To update to the release version of 3.5.0 depends on which firmware you are on now, and when you purchased a Gateway product. In most cases you should first try out an update via the web interface. If it succeeds, you are on 3.5.0. If it fails you need to flash the Gateway via the internal USB connection on the Gateway board.

Read the instructions below for the correct update procedure for your situation.

If you are currently on any 3.3 or older version you need to use the USB method anyway.
If you are currently on any 3.4 or 3.5 version first try the update via the web interface and if it fails update via the USB port.

Method one: Update via the web interface

Download the 3.5.0 bin file from the repository. Then open the web interface of the Gateway, go to System->Upload and select the bin file you just downloaded.
See: https://bbqkees-electronics.nl/wiki/gateway/firmware-update-and-downgrade.html#updating-firmware-via-the-web-interface

The upload will take about a minute. If the Gateway has installed the firmware and rebooted itself, you should see the login screen again after a while. Press F5 to clear the browser cache. Then login.
Settings should be pertained.


In case you get an error 500 during the upload, you need to move on to method two below.


In case you have an E32 Gateway and it became unreachable after the update, the board profile might have been reset to S32 or Custom. Please login to the ems-esp access point, set the board profile back to E32, save, and reboot. Ethernet will be activated again.

Method two: Update via the USB port

If a lot of cases you need to upload this firmware via the USB port on the inside of the Gateway. It is the only time this is needed, if 3.5.0 is installed once, all future updates can be done via the web interface.

You need to open the Gateway, plug in the USB to a computer and load the firmware via the EMS-ESP flash tool. DO NOT use another flash tool as it will not work.
All settings will be lost after this update, so make a note of all important ones.
(You can also backup your settings and customizations before the update and load them once the update is done).

For the detailed update procedure look here: https://bbqkees-electronics.nl/wiki/gateway/firmware-update-and-downgrade.html#uploading-the-firmware-via-ems-esp-flasher-flashtool

If you have questions about the update you can send me an email via the contact form.

Breaking change: MQTT entity ID’s

For a number of entities in Home Assistant the unique ID has changed in the auto discovery config . This means these entities will have to be replaced inside HA.
This is because there is now support for multiple Gateways on a single MQTT broker. When enabled, which is now the default, all MQTT Discovery Entity IDs will include the MQTT base name and the shortname of the EMS-ESP device entity. For example what was previously sensor.boiler_actual_boiler_temperature will now become sensor.ems_esp_boiler_boiltemp. This means these entities will have to be replaced inside HA. See below. If you still want to use the old format and retain the history and script compatibility in Home Assistant then set this back to the old format.
There is a new checkbox in the Settings to keep the ID as in firmware 3.4 for those who do not want to switch now.


Another way is to rename the entity ID’s in the HA database with a script. See: https://github.com/emsesp/EMS-ESP32/issues/804

Possible bugs

After the update to 3.5.0 it is possible that sometimes during loading or viewing of the web interface you’ll get an Error 507.
This is because the new web interface needs a fairly large chunk of memory, which is not always available. You get this error 507 then. All other services on the Gateway will continue to work. See: https://github.com/emsesp/EMS-ESP32/issues/823

Posted on

Difference between the EMS Gateway and the KM200/MBLAN2

Bosch has internet gateways for selected EMS boilers and heatpumps. It’s a range of models like the KM50, KM100, KM200 and MBLAN 2. Depending on the brand there are small variations. Nefit just calls it ‘Internet module’. There is an external model for existing boilers and an internal module for heat pumps. With this gateway and an app on your phone you can see (partly) what your boiler is doing.

The BBQKees EMS Gateways also give insight into boiler parameters.

I often get questions about the difference between the EMS Gateway and the Bosch KM200 Internet gateway. In this article I’ll explain it in more detail.

How does the KM200 work

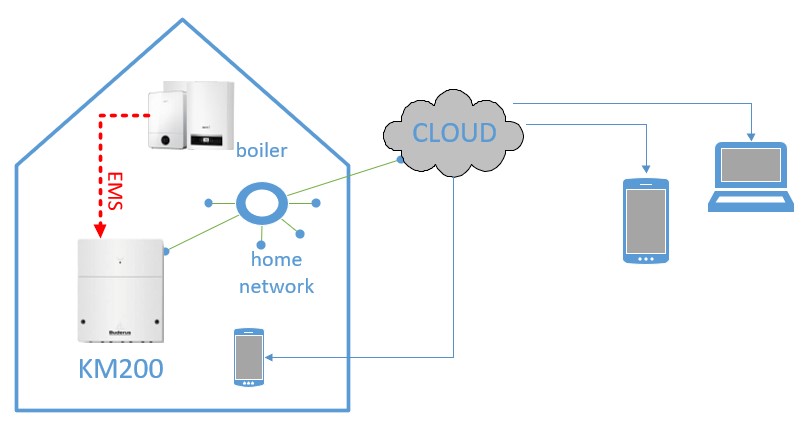
The KM200 (and the other Bosch internet gateways) connect to the CAN or EMS bus of the boiler or heatpump and your home network. The data it captures from the bus is then sent to the cloud.
You need to install an app on your phone to see the data. The app does this by connecting to the cloud and retrieving your boiler data from the cloud. So all your boiler data is stored in the cloud.
It provides a link between your boiler and an app via the cloud.

How does the EMS Gateway work

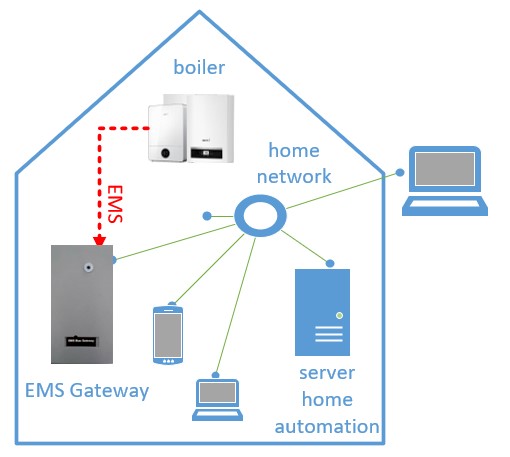
The EMS Gateways also connect to the EMS bus of your boiler or heatpump and your home network. The data it captures is then sent to your home automation like Home Assistant or Domoticz.
It depends on how you configured your home automation on how you can access the data. Likely via a web interface on your pc but probably also via an app.
The EMS Gateway provides a link between your boiler and your home automation solely via your home network. So you do not need an external cloud service. All boiler data is stored locally in your home automation system.

Amount of available datapoints

Existing owners of a KM200 are often surprised by the amount of datapoints/entities the EMS Gateway provides over the KM200. With the EMS Gateway you usually get 60 entities of just the boiler alone. With some boilers and heat pumps this may add up to much more (100+). For thermostats and mixer modules it depends on the specific model but there are always some interesting values coming out.

Posted on

Remote access to the Gateway

The EMS Gateways run on your local network and work without any cloud service.
This is by design and it is a great feature on its own, because you do not need to rely on an external internet service to keep your own home automation running perfectly.

However, a cloud connection provides one benefit that running something on your local network does not have; easy remote access.
If you put something in the cloud, data is available anywhere. When you put it only in your home network, it’s not always easy to access it when you are not at home. But there are several ways to get it out though.

Create a VPN connection (secure)

Almost all decent routers support a VPN service. By setting up a VPN server on your router, you can make a secure connection to your home network remotely. Once you connect to the VPN, your device will think it is inside the home network. Therefore you can also access the Gateway or your home automation via it’s internal IP address.

Please note this is different from a VPN service for which you can buy a subscription such as NordVPN. That is a VPN client and is intended for secure web browsing. This is the other way around.

The benefit of a VPN connection to your home network is that you have a very secure connection and nobody else can access it (easily).
The downside is that you would have to open the VPN connection each time before you want to connect remotely, but that’s a small price to pay for the sake of security.

Check the manual of your router on how to set up a VPN server. This may also be called a Remote access VPN.
After the VPN server is running, you need to setup the VPN clients on your mobile phone or laptop to access the network. For Android you can set up a VPN client in the setting or use an external app like StrongSwan or Wifiman.

Use the Home Assistant app or cloud service

When you connected the Gateway to your home automation like Home Assistant, you probably do not need specific access to the Gateway itself. Everything is loaded and visualized within Home Assistant.
In this case you can use the existing ways of connecting remotely to Home Assistant to access the main features of the Gateway. You are probably already using the Home Assistant app on Android or iOS.

If you want to access Home Assistant remotely, this has to be configured properly. There is a good description on the Home Assistant website.

Add a port forward (insecure)

A third way of connecting to the Gateway remotely is by setting up a port forward from port 80 of the Gateway. By doing so, you can access the web interface of the Gateway remotely by typing in the external IP address of your home followed by a port number you set in the router. With access to the web interface of the Gateway you can see an overview of all the boiler parameters and you can also change the values of the boiler/thermostat if needed.

A benefit of this method is that you can easily connect to the Gateway remotely, but as a downside others can access it also pretty easily. Although the web interface of the Gateway is password protected, it was never designed to withstand all the various hacking attacks imaginable.

So although this method is easy to setup it is not recommended. The VPN method above provides a much better security.

Posted on

Changing the selected flow temperature on boilers with EMS-ESP

On some boilers from Bosch/Junkers/Buderus/Worcester changing a temperature only works if the rotary dials are set to AUT. Switching on/off is not possible, also set by the knobs.
On other controllers it is possible to send temperatures lower than the controller setting, but not higher. Some completely electronic settable controllers allow to change all values.
A new idea from a recent discussion and test: device-ID 0x12 is normally an alarm module that allows setting the flowtemp by a analog input. Try to set ems-esp to id 0x12 in the Settings and then try changing selflowtemp and selburnpow.

See the issue on Github.

Posted on

Settings not saved in firmware 3.4.2 and 3.4.3

Firmware 3.4.2 and 3.4.3 have a small bug. If they are flashed on a new Gateway or other ESP32, settings are not stored. This means when you set up the device, after reboot it loses all settings.
If you update from a previous version via the web interface this problem does not occur.
Gateways with this issue shipped in the past few weeks can be updated via the web interface to version 3.5.0 and then it will work.

If you get an error 500/server error when you load the 3.5.0 firmware via the web interface, you need to use the USB connection inside the Gateway to flash firmware 3.5.0.

The steps to update are as follows:

First download the latest 3.5.0 firmware from https://github.com/emsesp/EMS-ESP32/releases/tag/latest

The file is a bin file called EMS-ESP-3_5_0b7-ESP32.bin .

Next connect to the ems-esp wifi network of your new Gateway and go to settings->upload.
Choose the file you just downloaded.

The Gateway will now update and after a minute you should refresh the page.
(Perhaps you need to reconnect to the ems-esp wifi network again.)

Then on the Settings page it will show the firmware version. It should now show 3.5.0.

If loading 3.5.0 fails with error 500/server error please use the USB flashing method with the new EMS-ESP flash tool to flash the Gateway. You have to open the device to access the USB connector.
See: https://bbqkees-electronics.nl/wiki/gateway/firmware-update-and-downgrade.html#uploading-the-firmware-via-ems-esp-flasher-flashtool

For the E32 it advised to connect the 12V DC power supply while flashing via USB if available.

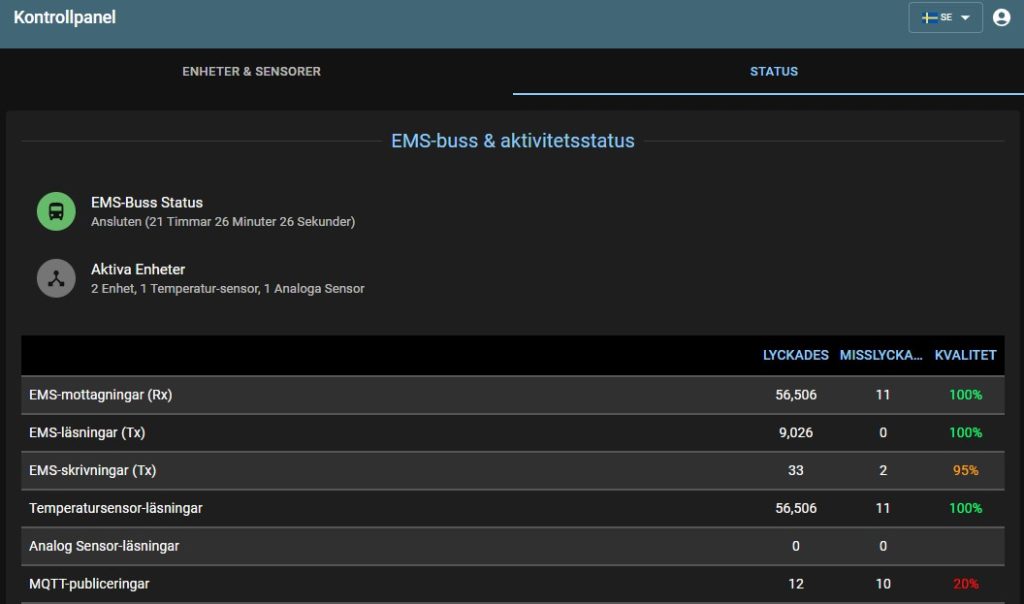
Firmware 3.5.0 is still a beta, but it is packed with new features. You can now set the language to Dutch, English, German or Swedish.

One remark: if you set a language, all MQTT entities are renamed as well so you have to reload everything into Home Assistant etc again.

Instead of 3.5.0 you can also load 3.4.1 via the web and then upload to 3.4.3 the same way to stay on stable.